A.Mi.Guru

Creative crochet studio

  • Home
  • Free pattern
  • Pedidos
  • YouTube
  • Loja online
  • Fale comigo
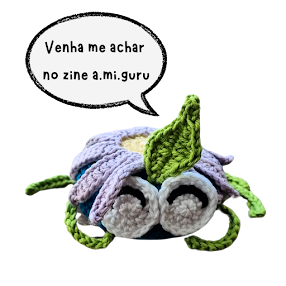
From bugsnax, here we have a Cappucceetle pattern. 

 SKILL LEVEL - Easy

This crocheted toy is a must-make for anyone looking to make a fan of bugsnax happy! 

 ----------------------------------- 

 asso a passo em inglês para você mesma crochetar o personagem Cappucceetle do bugsnax. 


  • 0 Comments

 Em comemoração a Primavera, receita grátis do nosso fofíssimo RhinoBee!!!


Rhinobee

Fios (100% algodão) 
Amarelo canário
Magenta 
Meada de preto 

 Materiais
 2.00 ou 2.25  agulha de crochê 

 Abreviações 
Correntinha = corr. 
Aumento = aum. 
Diminuição = dim. 
Ponto Baixíssimo = pbx. 
Ponto Baixo = pb. 
MPA = Meio ponto alto 
FLO: trabalhe pegando somente a alça da frente 

Dica A peça é feita por inteira da cabeça ao fim 

 Instruções 

Cabeça e corpo 

Comece com o fio amarelo 
1: Anel mágico 5 pb [5] 
2: aum em toda a volta [10] 
3-4: 1 pb em cada ponto por duas voltas [10] 
5: pegando somente a alça da frente ( FLO) faça aum em toda volta. [20] 
6: 1 pb em cada ponto [20] 
Mude para o fio magenta 
7: 8pb, 3 corr, pule o primeiro ponto da carreira,2 pbx na correntinha, 4pb, 3 corr, pule o primeiro ponto da carreira,2 pbx na correntinha, 8pb [20 + 2 perninhas] 
8: 8pb, dobre a perninha e pegue a alça de trás para continuar o trabalho, 4pb, dobre a perninha e pegue a alça de trás para continuar o trabalho, 8pb [20] 
9: Repita a volta 7 
10: Repita a volta 8 
Mude o fio para amarelo 
11: Repita a volta 7 
12: Repita a volta 8 
13: (1 dim, 2pb) repita 5 vezes [15] 
14: (1 dim, 1pb) repita 5 vezes [10] 
Coloque fibra. 
15: dim, 4 vezes [6] 
Arremate. 

Rabinho ( faça 1) 
Coloque a agulha em um ponto no meio da bundinha do RhinoBee e faça 3 correntinhas. 
Arremate e corte o fio com pouco de sobra para fazer a penugem. 

Orelhas ( faça 2) 
Coloque a agulha em1 ponto na lateral da carreira 6 e faça 1 pbx, 1 MPA, 1 pbx 

Chifres ( faça 2)
Coloque a agulha em 1 ponto em cima da carreira 2 e faça 1 pbx ,1 pb, 1 mpa, 1 pbx 

Nariz (faça 2 ) 
Coloque a agulha em 1 ponto na lateral da carreira 3 e faça 1 pbx, 1 pb ,1pbx 

Borde os olhos e a boca! 

Seu Rhinobee está prontinho! Obrigada por crochetar comigo 😉


  • 0 Comments

Oto, the Octopus 


Materials Needed: 
Yarn: Yellow and orange 
 Hook Size: B Hook or 2.25 mm 
 Scissors, sewing needle, stitch marker, fiberfill stuffing

 I’m using American crochet terms

ch – chain sc – single crochet 
Inc – Two single crochet stitches into one stitch. 
Dec- Yarn over, draw up a loop in each of the next two stitches, yarn over, and draw yarn through all three loops on the hook.
 sl st – slip stitch 

Pattern

Body
 R1: 8 sc in a magic ring 8 
Change color 
R2: 2 sc in all st (16) 
Change color 
R3: 1 sc , 1 inc (24) 
Change color 
R4 : 1 sc in all st (24) 
Change color 
R5: 1 sc in all st (24) 
Change color 
R6: 1 sc , 1 dec (16) 
R7: dec in all st (8) 
R8: Blo 1 sc in all st (8) 
R9: Both st, 1 sc in all st (8) 
Stuffing 
R10: Here you start the tentacles: 1sl st. 11 ch, turn and make 1 sc in each ch, finish with 1 sl st *. Repeat 8 times so you get 8 tentacles. End with 1 sl st 
R11:Using the chain we miss in the tentaculos FLO – Dec 8 times. R12: 
R12:Reverse magic ring crochet 

Embroider the eye 

 Happy Crocheting

  • 0 Comments

 Oto, the octopus 


 Materiais


Agulha crochê 2,25 
Sugestão de cores: amarelo e laranja 
Agulha de tapeçaria 
Fibra para enchimento. 
Marcador de ponto. 

 Dúvidas e comentários - @a.mi.guru 

 Abreviações

Correntinha = corr.
Aumento = aum.
Diminuição = dim.
Ponto Baixíssimo = pbx.
Ponto Baixo = pb.

Corpo 

8 pb. dentro do anel mágico 
Troca a cor 6 aum. = 16 pb. 
Troca a cor 
1 pb., 1 aum. 6x = 24 pb. 
Troca a cor 
24 pb 
Troca a cor 
24 pb 
Troca a cor 
24 pb 
1 pb, 1 dim. = 16pb 
Dim 8x = 8 pb 
Pegando somente pela alça de trás 8 pb 8 pb 
Pegando as duas alças 
Coloque o enchimento 

Tentáculos 

Pegando somente pela alça da frente faça 1 pbx e 11 correntinhas. Volta a partir do segundo ponto na agulha faça 1 pb em cada corrente. Repete por oito vezes. 

 Para finalizar, faça o anela mágico invertido usando somente as alças de trás dos tentáculos. 

 Borde os olhos 

  Feliz crochê!!!  


  • 0 Comments


Hi there!!! I´m so happy to realise my firt free pattern! If you have any douths, don´t hesitate to aks ;)


ABBREVIATIONS

• ch – chain

• sc – single crochet

• hdc – half double crochet

• dc – double crochet

•R1: round 1 or row 1

•bb: back bumps

•sc: single crochet

• inc – increase

• hdc-inc – half double crochet increase

• invdec – invisible decrease

•dec: decrease

• sl st – slip stitch

• st/s – stitch/es

• (...) – indicates stitch count changing colors

• (...) – indicates stitch count at end of round

• [...] – repeat the instructions in brackets


PATTERN


SHELL (make 2)

R1:  8 hdc in magic ring ( 4 green, 4 purple) (8)

Work in the third loop only for the rest of the shell.

R2: [Hdc-inc] x8 ( 8 green, 8 purple)  (16)

R3: [Hdc, hdc-inc] x8 ( 12 green, 12 purple)  (24)

R4: Hdc, hdc-inc, [2 hdc, hdc-inc] x7, hdc ( 16 green, 16 purple)  (32)

R5: [3 hdc, hdc-inc] x8 ( 20 green, 20 purple)  (40)

R6: 2 hdc, hdc-inc, [4 hdc, hdc-inc] x7, 2 hdc  ( 24 green, 24 purple) (48)

R7: [Hdc] x48 ( 24 green, 24 purple)  (48)


Sc in next st, sl st in next and fasten off invisibly.

Repeat for the 2nd piece.

Stuff firm.

 Sewing the 2 pieces together. 

Fastening off.


Head

This piece starts at the bottom using green yarn.


R1: Ch 15. Star ting in the 2nd bb f rom hook, 1inc, 12sc, 1inc. Rotate chain so

you' re working in the bottom loops, 1inc, 12sc, 1inc (32)

R2: 1sc, 1inc, 13sc, 1inc, 1sc, 1inc, 13sc, 1inc (36)

R3: 1sc in each st (36)

R4: 1dec, 16sc, 1dec, 16sc (34)

R5: 1dec, 15sc, 1dec, 15sc (32)

R6: 1dec, 14sc, 1dec, 14sc (30)

R7: 1dec, 13sc, 1dec, 13sc (28)

R8: 1dec, 12sc, 1dec, 12sc (26)

R9: 1dec, 11sc, 1dec, 11sc (24)

Switch to beige

R10: 1dec, 10sc, 1dec, 10sc (22)

R11: 1dec, 9sc, 1dec, 9sc (20)

R12: 1dec, 8sc, 1dec, 8sc (18)

R13: 1dec, 7sc, 1dec, 7sc (16)

R14: 1dec, 6sc, 1dec, 6sc (14)

R15: 1dec, 5sc, 1dec, 5sc (12)

R16: 1dec, 4sc, 1dec, 4sc (10)

R17: 1dec, 3sc, 1dec, 3sc (8)

R18: 1dec, 2sc, 1dec, 2sc (6)


Slst in next st and fasten off. Then weave in ends with a tapestry needle.

Stuff firm.

sew the shell to the head.


Antenna

6 ch

1 hdc in the 3nd ch from the hook

3 Slst in the remaining ch

fasten off and sewing to the head.


 Eye

R1: 8 sc in a mr (8) – do not close the mr

R2: 1sc, 1 triple inc (16)

Slst in next st and fasten off

Insert the eye.

Sewing to de head


Embroider the mouth with a large smile 

 Happy Crochetting :)
  • 0 Comments
Postagens mais antigas Página inicial

This is me

a


A.Mi.Guru


Creative crochet studio
🌈Crio objetos mágicos feitos de crochê
💡 Te ajudo com ideias para tecer
📚 Faço livros ilustrados com amigurumi
👀 Espia só
🔊 Pedidos personalizados entre em contato


Follow Us

  • Instagram
  • Canal do youtube

recent posts


contact

Nome

E-mail *

Mensagem *

Labels

abelha amiguru amigurumi amigurumi passo a passo amigurumi receita croche girassol amigurumi aranha amigurumi baby yoda bugsnax cappucceetle caracol chocalhos crochê crochet pattern cube dia dos namorados e-book feature feature abelha flor floraranha free crochet pattern free pattern fryder logo love mandolorian octopus polvo primavera receita amigurumi receita grátis croche snail chochet stop motion zineamiguru

Views

instagram

Template Created By : ThemeXpose . All Rights Reserved.

Personalizado por : S²FM . All Rights Reserved.

Back to top